


A clear bathroom renovation order of work keeps the project moving safely from messy strip-out to a clean, usable handover. In Dubai and across the UAE, that sequence matters even more because bathrooms combine water supply, drainage, electrical work, waterproofing, ventilation and high-value finishes in a compact space.
If the order is wrong, beautiful tiles can hide weak waterproofing, new cabinets can block maintenance access or a luxury shower can drain poorly after the room is finished. The safest approach is to make each trade complete its work at the right stage, then inspect before the next layer covers it.
This guide walks through the practical sequence homeowners should expect, from demolition to final checks, so you can speak more confidently with your renovation team and understand what should happen before handover.
Bathroom renovation order of work at a glance
The bathroom renovation order of work begins before anyone lifts a hammer. Design, site checks, material selections and approvals should be settled first because bathroom delays often come from late decisions on concealed items such as mixers, drainage positions, wall-hung toilets and ceiling access panels.
Here is the typical sequence for a full bathroom upgrade:
| Stage | Main work | What should be checked before moving on |
|---|---|---|
| Pre-start | Scope, drawings, approvals and material procurement | Layout, fixture specifications, access and protection plan |
| Demolition | Remove old fixtures, tiles, ceiling and damaged substrate | Hidden leaks, slab condition, wall condition and waste disposal |
| Civil work | Adjust walls, openings, niches, screed levels and slopes | Dimensions, door swing, shower fall and substrate stability |
| MEP rough-in | Plumbing, drainage, electrical and ventilation preparation | Pressure tests, drainage alignment, switch positions and exhaust route |
| Waterproofing | Primer, membrane, upturns and wet area sealing | Coverage, curing time, flood test where specified |
| Finishes | Tiling, ceiling, painting, sanitaryware, cabinetry and mirrors | Tile alignment, access panels, silicone joints and fixture stability |
| Handover | Testing, snagging, cleaning and documentation | Water flow, drainage, electrical safety, defects and maintenance guidance |
At this point, the bathroom renovation order of work becomes a quality control tool, not just a schedule. Each stage protects the next one, which is why rushing through hidden work usually costs more than doing it properly the first time.
Before demolition: scope, approvals and procurement
Before site work begins, the renovation team should confirm the bathroom layout, fixture locations, tile sizes, storage plan, lighting concept, plumbing changes and finish schedule. This is also the right moment to check whether building management, community or authority approvals are needed, especially in apartments, towers and shared villas.
For homeowners still deciding on layout or budget, a structured guide on how to plan a bathroom remodel step by step can help turn broad ideas into a workable scope before demolition starts.
Skipping procurement can break the bathroom renovation order of work because concealed fittings often determine what happens inside the wall. A concealed shower mixer, wall-hung WC frame or linear drain should be available early enough for the plumber and civil team to set exact measurements.
Site protection and temporary arrangements
Bathrooms are small rooms, but renovation dust travels quickly. The contractor should protect corridors, lifts, adjacent bedrooms, wardrobes and flooring before demolition. Water and electricity isolation points should be identified and safe working access should be agreed with the household or building team.
If the property has only one usable bathroom, plan a temporary routine before work starts. A realistic schedule should include curing time, inspection time and material delivery time, not only active labor days.
Stage 1: demolition and strip-out
Demolition is more than breaking tiles. In the bathroom renovation order of work, this stage exposes the real condition of the room, including old pipework, failed waterproofing, cracked screed, hollow tiles, weak plaster, hidden dampness and previous repair shortcuts.
A controlled strip-out usually includes removing sanitaryware, mixers, accessories, glass partitions, vanity units, false ceilings, wall tiles, floor tiles and loose substrate. If the existing plumbing is being replaced, old pipe runs may also be opened at this stage.
Good demolition is selective. The team should avoid unnecessary damage to structural elements, neighboring rooms and shared services. In apartments, noisy work hours and debris removal may be controlled by building rules, so coordination matters.
After strip-out, the site should not move straight into finishes. The contractor should inspect the exposed surface, mark corrections and confirm whether the original plan still works. If hidden defects are found, this is the right time to adjust the scope.
Stage 2: civil corrections and layout preparation
Civil preparation creates the physical base for the bathroom. This can include rebuilding damaged plaster, modifying blockwork, creating shower niches, preparing ledges, adjusting floor levels, correcting slopes and forming a stable base for waterproofing.
The key question is whether water will move where it should. Shower areas need proper falls toward the drain, wet zones need clean corners for membrane upturns and floor levels should be coordinated with adjacent rooms to avoid awkward thresholds.
This stage is also where the team checks dimensions against actual fixtures. Large-format tiles, wall-mounted taps, recessed cabinets and frameless glass screens leave less room for correction later. If the wall is not plumb or the niche is misaligned, the issue will be visible after tiling.
For luxury bathrooms, civil preparation may also include support for heavy stone counters, built-in benches or wall-hung sanitaryware. These supports should be planned before waterproofing and tile installation, not improvised after finishes arrive.
Stage 3: plumbing and electrical rough-in
This is the stage in the bathroom renovation order of work where the bathroom’s hidden performance is built. Plumbing and electrical teams install or reposition services before waterproofing, tiles and ceilings cover the walls and floor.
Plumbing rough-in normally covers hot and cold water supply, drainage, trap positions, mixer bodies, shower outlets, toilet connections, basin supplies and any provisions for heaters or pumps where applicable. Drainage deserves close attention because poor fall, bad trap placement or weak venting can cause odors and slow drainage even in a newly renovated bathroom.
For a deeper look at concealed service planning, Renovate UAE explains what a plumbing remodel includes before new finishes and why it should be completed before surfaces are closed.
Plumbing checks before walls close
Before waterproofing begins, the contractor should test supply lines for leaks and confirm that drain points match the selected sanitaryware. A small difference in basin height, vanity depth or toilet outlet location can cause visible compromises later.
Floor drains, linear drains and shower channels should be set with tile thickness in mind. The plumber, tiler and civil team need to coordinate because the finished drain level depends on screed, waterproofing, adhesive and tile thickness.
Electrical and ventilation rough-in
Electrical rough-in covers lighting points, mirror lights, shaver sockets, exhaust fans, switches, smart controls and any provisions for heated mirrors or other approved bathroom accessories. All electrical work should follow local safety requirements for wet areas, including suitable protection and safe distances from water sources.
Ventilation should not be treated as an afterthought. Without adequate extraction, steam can damage paint, ceiling boards, grout and cabinetry. The exhaust route, fan capacity and access for maintenance should be confirmed before closing the ceiling.
Stage 4: waterproofing, screed and leak testing
For UAE wet areas, the bathroom renovation order of work should give waterproofing enough time and attention. Waterproofing is not visible at handover, but it is one of the most important parts of the entire renovation.
The surface must be clean, stable and prepared before membrane application. Corners, pipe penetrations, drain edges and wall-to-floor junctions are the weak points, so they need careful detailing. Wet zone upturns should be high enough for the design and the membrane should be compatible with the tile adhesive system.
Where specified, a flood test or controlled water test helps confirm that the membrane is performing before tile installation starts. If water damage appears after tiling, repairs become disruptive and expensive because finished surfaces may need to be removed.
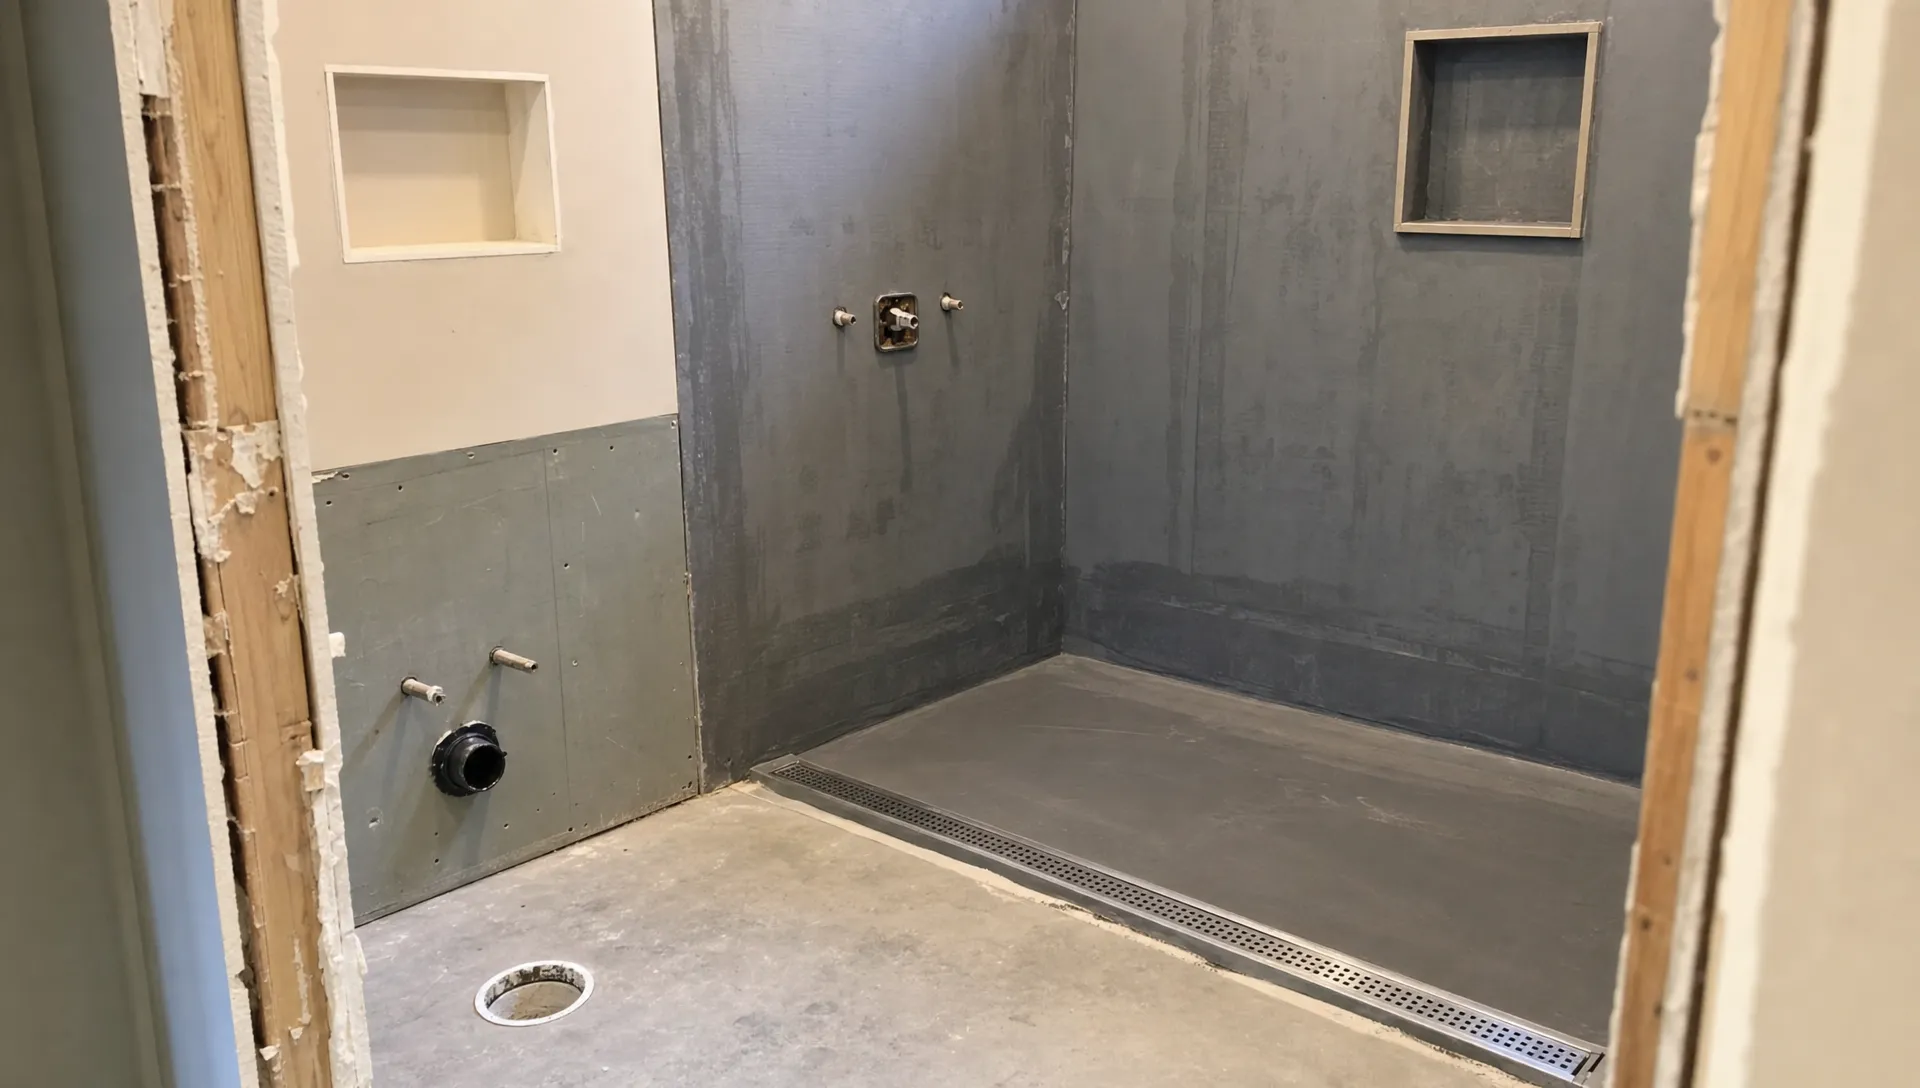
Screed and leveling work should also respect slopes. A perfectly flat shower floor may look tidy during construction, but it can leave standing water after handover. The contractor should verify falls before the tile adhesive stage begins.
Stage 5: tiling, ceiling and surface finishes
Once the wet area passes checks, the bathroom renovation order of work moves into visible finishes. This is when the room begins to look like the design, but the work still depends on the hidden stages being correct.
Tiling should begin from a planned reference line, not a random corner. The tiler should coordinate cuts around niches, drains, mixers, toilet frames, ledges and door edges. Tile layout affects the final feel of the bathroom, especially with large-format porcelain, marble-look slabs or patterned feature walls.
Grout lines should be consistent and movement joints should be treated correctly in corners and changes of plane. In wet areas, silicone sealant is commonly used at internal corners and around sanitaryware because rigid grout can crack where surfaces move.
False ceilings, access panels and paint finishes usually follow the rough-in and may run alongside tiling depending on the project. Access should remain available for exhaust fans, valves or service points. A ceiling that looks seamless but blocks maintenance can create problems later.
Stage 6: sanitaryware, cabinetry and final fixtures
After tiling and ceiling finishes are ready, the team installs the visible fixtures: toilet, basin, vanity, shower mixer trims, glass partition, mirrors, lighting, towel rails, shelves, accessories and final silicone sealing. If custom cabinetry is part of the design, site measurements should be checked after tiling because finished dimensions can differ from rough dimensions.
Near the end of the bathroom renovation order of work, patience still matters. Silicone needs proper application and curing. Glass partitions need accurate alignment. Wall-mounted fixtures need secure fixing, especially if the wall substrate was changed during the renovation.
This is also the stage when homeowners usually want access back as quickly as possible. If the renovation affects your master suite, pack a small temporary kit with toiletries, towels, nightwear and breathable basics such as comfortable woven cotton boxer shorts so you are not searching through covered wardrobes while final works continue.
For a broader view of what a complete upgrade can include, from design to fixture installation, see Renovate UAE’s guide to full bathroom remodeling service.
Stage 7: testing, snagging, cleaning and handover
Handover is not only a final clean. It is the point where every system and finish should be checked in front of the homeowner or client representative. A polished bathroom can still have issues if water pressure, drainage, ventilation or electrical fittings are not tested properly.
A practical handover should include running every tap, testing hot and cold supply, checking the shower drain, flushing the toilet several times, inspecting under the vanity for leaks, testing lights and exhaust fans, checking cabinet doors and reviewing glass alignment.
The bathroom renovation order of work ends with documentation and maintenance guidance. Homeowners should understand how to clean the tiles, what products to avoid on stone or metal finishes, how to maintain silicone joints and where access panels or isolation valves are located.
Handover checklist for homeowners
Use this checklist before accepting completion:
- All fixtures are secure, aligned and free from visible damage
- Hot and cold water work correctly at every outlet
- Drains clear quickly without odors or gurgling
- Shower water flows toward the drain without pooling
- Lights, sockets, exhaust fans and switches function properly
- Vanity doors, drawers, mirrors and accessories are level
- Silicone joints are neat, continuous and fully cured
- Floor, wall tiles and grout are clean and consistent
- Access panels, valves and maintenance points remain reachable
- Snags are recorded with agreed correction dates
Common sequencing mistakes that cause bathroom delays
A good contractor protects the sequence because most bathroom failures happen when stages overlap in the wrong way. These are the mistakes homeowners should watch for during a renovation:
- Installing tiles before plumbing pressure tests are complete
- Ordering concealed mixers after the walls have already been prepared
- Closing ceilings before exhaust fan routes and access panels are confirmed
- Starting waterproofing on dusty, unstable or damp surfaces
- Fitting vanities before silicone, paint or tile corrections are finished
- Choosing sanitaryware without checking waste outlet positions
- Accepting handover before testing drainage under real water flow
These mistakes do not always show up on day one. Some appear weeks later as odors, loose fittings, stained ceilings, cracked grout or slow drainage. That is why the bathroom renovation order of work should be visible in the project plan and respected on site.
Sample timeline for a bathroom renovation in the UAE
No timeline applies to every bathroom. A compact apartment guest bathroom with minimal layout changes can move faster than a villa master bathroom with new plumbing, custom joinery and premium stone finishes. Building rules, material availability and curing times also affect the schedule.
Use this table to understand how the bathroom renovation order of work may translate into project timing:
| Bathroom type | Typical scope | Indicative duration |
|---|---|---|
| Small guest bathroom refresh | Replace tiles, sanitaryware, vanity, lighting and accessories with limited layout changes | Around 2 to 4 weeks |
| Apartment bathroom remodel | Strip-out, plumbing updates, waterproofing, tiling, ceiling and new fixtures | Around 3 to 6 weeks |
| Villa master bathroom renovation | Layout changes, shower expansion, custom vanity, premium finishes and upgraded lighting | Around 5 to 8 weeks or more |
| Luxury bathroom upgrade | Complex MEP changes, stone or large-format surfaces, bespoke joinery and detailed lighting | Around 6 to 10 weeks or more |
These are planning ranges, not guarantees. A professional team should give a site-specific schedule after inspecting the bathroom, confirming the scope and checking material lead times.
Frequently Asked Questions
What is the correct bathroom renovation order of work? The usual sequence is planning, approvals, procurement, demolition, civil preparation, plumbing and electrical rough-in, waterproofing, tiling, ceiling work, fixture installation, testing, snagging and handover.
Should plumbing or waterproofing come first? Plumbing rough-in comes before waterproofing because pipe positions, drains and mixer bodies must be installed and tested before the waterproofing layer seals the wet area.
Can tiling start before all fixtures arrive? Some tiling can proceed if dimensions and concealed parts are confirmed, but it is risky to start without critical items such as mixers, drains, wall-hung toilet frames and vanity specifications.
How long should a bathroom renovation take in Dubai? A straightforward bathroom may take a few weeks, while a villa master bathroom or luxury upgrade can take longer due to approvals, demolition findings, waterproofing, curing time, custom materials and handover checks.
What should I check before accepting handover? Test water flow, drainage, hot and cold supply, ventilation, lighting, cabinet operation, silicone joints, tile alignment, leaks under the vanity and access to maintenance points.
Plan your bathroom handover with Renovate UAE
A bathroom renovation succeeds when each hidden stage supports the final finish. Demolition, MEP rough-in, waterproofing, tiling and handover all need to happen in the right sequence, with inspections before work is covered.
Renovate UAE provides villa, apartment and home renovation services across the UAE, including bathroom upgrades, plumbing, electrical work, carpentry, painting and interior design solutions. If you are planning a bathroom remodel, request a free site visit and estimate so the scope, sequence and finish expectations are clear before work begins.